Lessons
All ProjectsRPi-ano | RPi + Momentary Push Buttons
Make your own GPIO Piano! See here for Education Resource
Check out some extra images here
Kit List
- RPi
- Breadbroad large enough for the # buttons
- 5 x Monentary Push Buttons
- 5 x 1k resistors
- 5 x LEDs
- 5 x 220ohm / 330 ohm resistors
- GPIO expansion cable (or Male to Female jumper cables)
- Jumper Cables
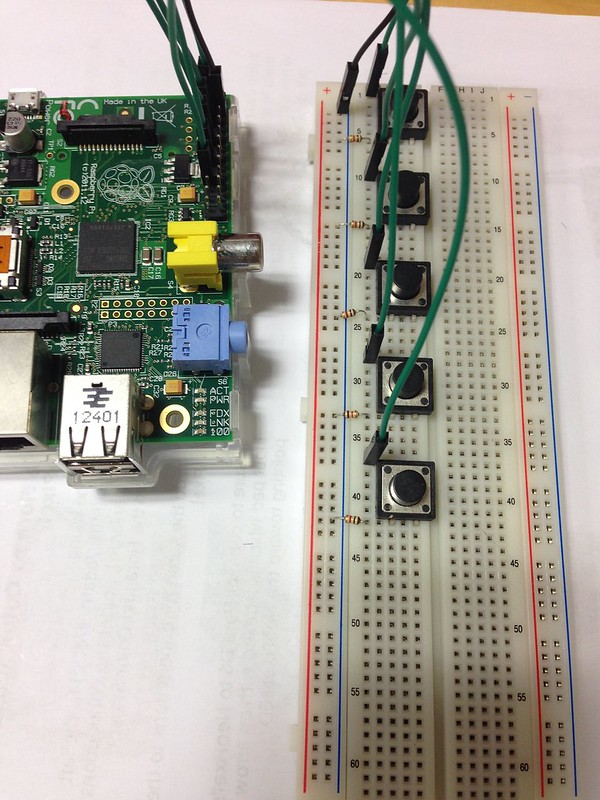
STEP 1 Setting up the bread(key)Board
TIPS: The momentary push buttons used to create the keys of the piano are a little tricky at pushing into the breadboard. Carefully check the pins are straight and that they are in the correct position. With a little force push the buttons with two fingers either side of the push button. This is important because bent pins will not work.
Why used a GPIO expansion cable, also know as a cobbler? To avoid damage to the RPi GPIO pins. If they get break/bent or are they are incorrectly connected this could permanently damage your RPi. Why is it called a cobbler – The reason being is that Adafruit develop this PCB and cable to enable access to the GPIO pins without frying your RPi. Why is called cobbler: Because it is a nice pun: Cobble means to hack something together, and cobbler is a dessert similar to pie.
STEP 2 Installing code libraries
In order for the push buttons to play a sound we need to install some code libraries so that the RPi knows that we have pressed a certain. Then we can program/ code the button to play a certain sound.
The are many languages that we could use to make our keyboard plays sounds. For this project we are going to use Scratch with a GPIO library.
GPIO Scratch | You may be working with a RPi that has all the libraries installed. On the desktop of the RPi you will ScratchGPIO. If not follow the instructions below. The ScratchGPIOplus icon is for using with specific add-on boards like the pibrella.
http://cymplecy.wordpress.com/scratchgpio/scratch-raspberrypi-gpio/
The following instructions will create a new Scratch icon on the desktop with ScratchGPIO written underneath the scratch cat icon.
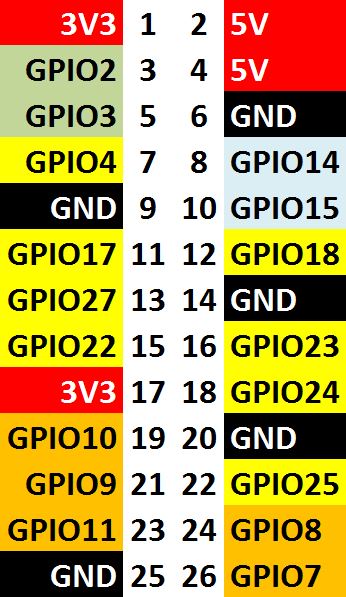
RPi pin mapping
With Raspberry Pi connected to Internet
Open up an LX Terminal window
Select Edit and the Paste that into an LX
Terminal window and run it to download the installer. Or type the command. Only use the development version if you are confident with using BETA versions of software.
sudo wget http://goo.gl/Pthh62 -O isgh5.sh
or wget http://goo.gl/UgoQgB -O isgh5dev.sh (development version June 2014)
Once the installer has been downloaded then just type (or copy and paste the text below as before)
sudo bash isgh5.sh
or wget http://goo.gl/UgoQgB -O isgh5dev.sh (development version June 2014)
STEP 3 Writing the code
[insert video/ images of scratch code] There are many ways to write this code here is just one example
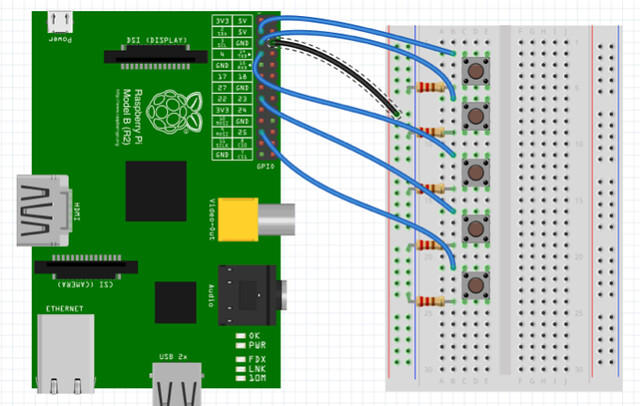
STEP 4 Connecting between RPi & breadboard
Without using GPIO expansion cable.
- Connect the ground cable (black) using one of the GROUND pins on the RPi to the – power rail on the breadboard
- connect one resistor per push button ensuring that the line up with one of the legs of the button. The other end is inserted in to the negative (blue) power rail of the breadboard (the same row) To learn more about resistors see here
- connect the jumper cable from the push button to one of the GPIO pins on the Rpi. Note that not all the pins are available in this version of Scratch GPIO. To check which ones are available open scratchGPIO and use the drop on the code block to show the pins numbers available. This is the pin location not the pin name.
With GPIO expansion cable

RPi-ano
STEP 5 TESTING and Jamming
Test each button with a simple sound effect. This enables you to check that your button is working. You can record your own sounds for example – Halloween sound effects to a game that you have create or Music mixing. Use more buttons to create your own working games controller.