Lesson for RPi and Momentary Push Button
NOTE: Scratch GPIO is being Updated at the time of writing. (Lesson will be updated once software is released)
Overview:
This is a Scratch GPIO coding project using the RPi and Push Buttons on the duration of your lesson this project should take 1-3 lessons (1 hour per lesson).
This works well in pairs or small groups depending on the number of students and the equipment that you have available.
Kit List:
RPi
Momentary Push Button (5)
Jumper cables male to Female solderless
Resistors 1K
GPIO expansion cable optional
Solderless Breadboard large enough for the buttons
Starter
- 5-10 mins Play video of completed kit or demonstrate one that is already completed
- Or hand out RPiano Worksheet and push buttons per group or individual . Question: What can you do/make with this BUTTON? Get the students to be creative, the more bonkers the idea the better. By asking this question at the beginning they are not limited by the current abilities for hardware or coding.

Main – Wire Up / Code It
This activity should take between 40-60mins depending size class, experience and dexterity. This can be spilt into 2 lesson one focusing on the circuit / build and the other focusing on the code. Take your time.
Activity 1
Hand out RPiano Worksheet and ask the students (in pairs) to work out how to wire up the RPi to the breadboard. Use multiple colours if you have them. Use the Black for Ground, Red for Power and Blue or Green for the GPIO pins. Be consistent with your choice of colours. Check out Jumper (hook-up)cables for more information. Students may wish to label each wire for each button. This helps if you have a large gap between lessons and you wish to continue the project over more than one lesson.
- If this is the very first time students have seen an RPi or any wiring diagrams then go through RESISTORS and GPIO first. See scratch animation about resistors. Get the students to create a short animation / image or other explaining briefly in their own words what resistors / GPIO are. This work may be used for classroom / online displays to show what the students have been learning in class.
This project works well by building a smaller single button circuit first and the allowing the students to continue creating the RPI-ano independently until that have a adding all the buttons.
Activity 2
Raspberry Pi Pin name and numbering:
This activity is to get the students familiar with the names of the names and their corresponding PIN location. The PIN name is important as these terms are used for higher level projects and will also be in the updated version of Scratch GPIO for RPI once it is released.
Below in image one we can the see a single LED and resistor attached to the RPI using the GPIO pins. This site has great interactive RPI Pin diagram (link opens another tab). This is a fabulous resource to use to introduce GPIO pins to your students.

Image 1 RPi GPIO with LED

Image 2 RPI GPIO pin layout
Activity 3 Single button circuit
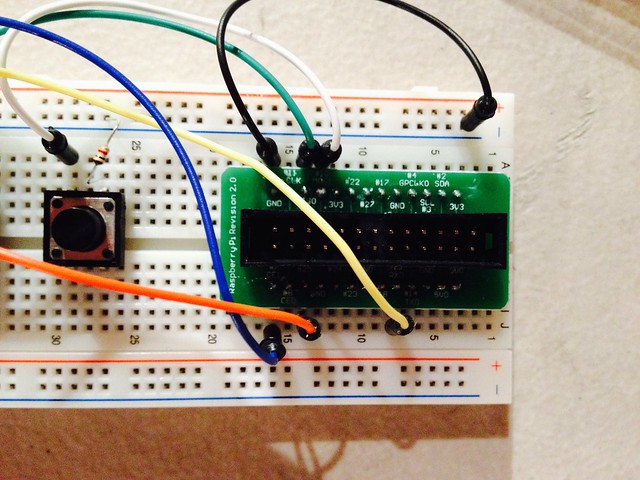
- Wire up just the push buttons to the RPI or via the GPIO expansion cable (as seen in the image above)
- Students to write pseudo code (or animation) of how they think it work
- Once complete run the code to test the the push button
- Students to write pseudo code (or animation) of how they think it work
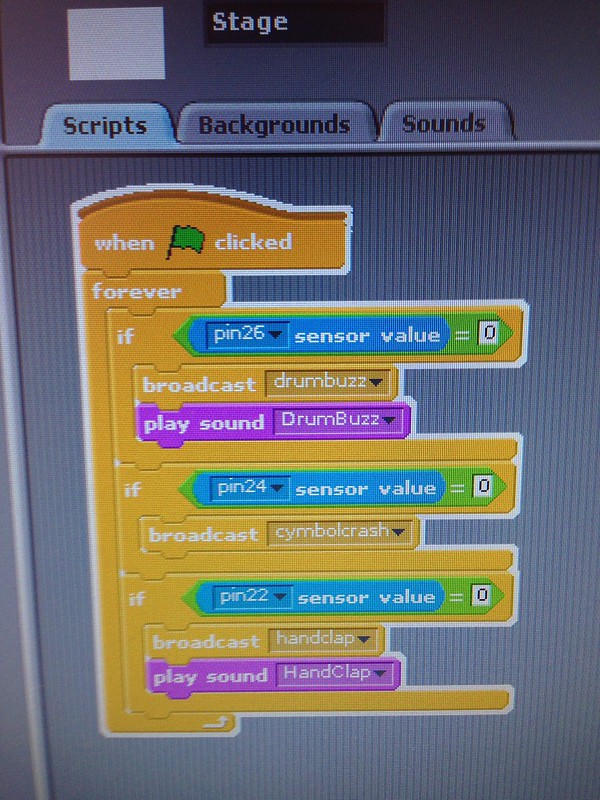
- The scratch code below shows three different PINS in use. They are using broadcast to activate the code and play a sound/ animation on screen. This could also be used to turn on LEDS as an extension activity.
Activity 4 Adding all the Buttons
- Build the complete circuit using the wiring diagram
- Create pseudo code / animations that explain how they think code works.
- Run the RPi-ano Code: Playing Sounds.
- Students to record their own sounds or modify the ones in the scratch file.
- Run the Blink Code: LEDS to light up
Decide which option you are going to use and state (display on the board) this to the class or let the students decide depending on their age/ ability and class size.
Hand out the kit for each group/ pair or individual. (RPI, Breadboard, Ultrasonic sensor, jumper cables, LEDs and resistors). Give the students plenty of time wire this up. It can be very ‘fiddly’ with the small components and this can lead to some students feeling a little frustrated. If this is the case then give them another set of cables/ breadboard/ resistors to practice on while the ‘group’ finish the circuit. If there are no spare kits/ resources then get some students to be journalist and document the whole process with pictures video and interviews. During this time some students can be working on the code while others are building the circuit.
Code
What is the code doing?
All the code contain variables, loops and boolean values. This a really clear way of explaining boolean in a simple physical way. By using code and push buttons why not use it your classroom as a buzzer or instead of you asking the class to be quiet. Make your own teaching voice assistatn. This project could be enhanced further by having appropriate animation that are triggered when the buttons are pressed. A possible fun way to make their own music / musical instruments. Create game controller using the push buttons, sounds and game animation.
Wrap Up
Show case each ‘groups’ work and ask each one what was the most challenging / interesting thing about this project.
Ask the students what could this new device be used for and what enhancements/ changes could the make to make it ‘better’ for them?
Assessment
Give the student a copy of the Standards/ Programme of Study / State Level Content Standards. 1) The students, in their groups, should select (tick or colour- in) all the points that they feel the project covers. 2) Get the students to mark themselves as a group on wether or not the partially or fully achieved each point. 3) Mark themselves individually. This type of activity is really useful in getting the students to understand how you as an educator have evidence their learning and progression.
Using the pseudo code/ animations you will be able to see what the students actually understand about the project and relate this back to the assessment criteria/ standards.
Below will find the curricular mapping for UK, USA and AUS/NZ
Curriculum Mapping:
UK Keystage 3 / 4
design, use and evaluate computation abstractions hat model the state and behaviour of real-world problems and physical systems.
understand several key algorithms that reflect computational thinking, such as ones for sorting and searching; use logical reasoning to compare the utility of alternative algorithms for the same problem
use programming languages (graphical), to solve a variety of computational problems; make appropriate use of data structures such as lists, tables or arrays; design and develop modular programs that use procedures or functions
understand simple Boolean logic [such as AND, OR and NOT] and some of its uses in circuits and programming; understand how numbers can be represented in binary, and be able to carry out simple operations on binary numbers [for example, binary addition, and conversation between binary and decimal
undertake creative projects that involve selecting, using, and combining multiple applications, preferably across a range of devices, to achieve challenging goals, including collecting and analysing data and meeting the needs of known users.
develop their capability, creativity and knowledge in computer science, digital media and information technology.
develop and apply their analytic, problem-solving, design, and computational thinking skills.
USA
Project mapped to commoncore
AUS/NZ
Digital Technologies knowledge and understanding
6.1 Investigate the main components of common digital systems, their basic functions and interactions and how such digital systems may connect together to form networks to transmit data
Digital Technologies processes and production skills
6.4 Define problems in terms of data and functional requirements, and identify features similar to previously solved problems
6.9 Manage the creation and communication of ideas and information including online collaborative projects, applying agreed ethical, social and technical protocols
8.10 Create and communicate interactive ideas and information collaboratively (online), taking into account social contexts
8.11 Plan and manage projects, including tasks, time and other resources required, considering safety and sustainability
Design and Technologies knowledge and understanding
6.2 Investigate how forces or electrical energy can control movement, sound or light in a designed product or system
8.3 Analyse how motion, force and energy, are used to manipulate and control electromechanical systems when designing simple, engineered solutions
Design and Technologies processes and production skills
6.8 Apply safe procedures when using a variety of materials, components, tools, equipment and techniques to make designed solutions
8.9 Effectively and safely use a broad range of materials, components, tools, equipment and techniques to make designed solutions
4.9 Plan a sequence of production steps when making designed solutions individually and collaboratively
6.10 Develop project plans that include consideration of resources when making designed solutions individually and collaboratively
8.11 Use project management processes individually and collaboratively to coordinate production of designed solutions