Piano Glove | adafruit
Playing music with your hand. This project requires soldering some of which is a little delicate. If you are a beginner at soldering then get someone else to solder the audio board and continue on with the project and Using colour & sound to play sounds Adafruit’s Piano Glove Project by C Cunningham Education Resource
Kit List
Glove
Wire Snips
Jumper Cable
‘Colour’ sensor (
Neopixel
Lipo Battery (check it is charged: use a usb lipo charge if required)
Audio Codec Board
Portable Speaker (check batteries)
Needle
Thread
Adafruit Arduino Learning System
Review the Kit and ensure that you have everything you need for your piano glove. Audio Code board, Portable Speaker and Lipo Battery can be placed to one side during the first part of this task.
Step 1
Adafruit flora | ‘Florafication’ of Arduino
The Flora is an Arduino board. This means that it uses the same programming language as an Arduino Yun or Uno. But unfortunatelyYou can’t just download the Arduino platform and use it with the Flora. Because the Flora has a different microchip on the board plus a few other differences. The arduino standard release doesn’t know that the flora has a specific chip s you have to modify the software so that it can communicate properly with the board. Thankfully the ace Adafruit team have developed a Florafied version of Arduino called Adafruit Learning System. This version also works with the standard arduino boards.
There are two ways to Florafication: If you don’t have Arduino already installed then download there software. See here for full instructions
https://learn.adafruit.com/getting-started-with-flora/download-software
Flora-fi your version of Arduino by modifying the program files. Be careful and follow all the instructions on their site as you could corrupt the software.
https://learn.adafruit.com/getting-started-with-flora/ide-florafication
For the Project: You will need three code libraries / sketch
NeoPixel Library
TCS34725 RGB Color Sensor Library
PianoGlove MIDI
These enable to boards to communicate and play sounds based on colour.

Flora pin layout
Step 2 Wiring Diagram
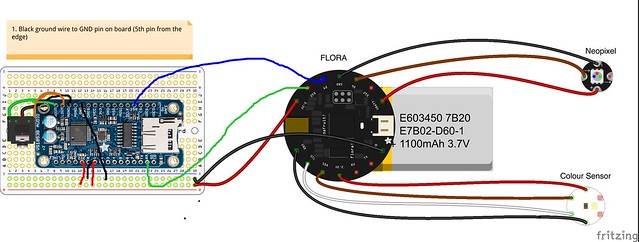
The Wiring Diagram for the FLORA, NEOPIXEL & COLOUR SENSOR. Plan carefully to ensure that the cables fit various hand sizes. Working with others can really help with this step.
1. Solder the headers to the audio codec board and headphone jack to the board.

2. Connect Flora to Color Sensor & NeoPixel

Connecting colour sensor and neopixel
Cut the wires to the correct length: wrist to finger tip. remember to allow for twist back.
Using the wiring diagram twist back (stripping the wires to expose metal wire and then threading through holes and twist tying each one) the connections between the Flora and Colour Sensor.
Then do the same for connections to the NeoPixel. Be sure to connect Flora D6 to NeoPixel’s input pad which is labelled with an arrow pointing toward the NeoPixel LED.
This part of the build be completed with conductive thread.
3. Connecting the Flora to the soldered audio codec board
Step 3
LETS GET SNIPPING
First we’ll prep the wires which run from the Flora to the Colour Sensor, NeoPixel, The wires to the Audio Codec Board have already been soldered.
Using Ribbon cable can be handy for keeping wires grouped, but any common type of hookup or jumper cable will work just fine.
Cut 7 pieces of wire a bit longer than the distance between your pointer fingertip and wrist. The extra length is for threading through the holes to make connections.
Cut an additional 4 pieces of wire to about 4.5″ lengths.
Strip the end of each wire enough to be able to thread through the holes and twist tie. Ensure that the wires don’t touch any of the other ‘pads’. This is will cause errors with the glove.
STEP 4 Let’s get sewing
Although it is not necessary to wear the glove whilst sewing to does help in getting a better fit. This is definitely a team activity.
Let’s Get Stitching.

THE FLORA:
Attach the Flora to the glove on the centre of your hand, top side. Use any unused pads (holes) and stitch in place with normal thread. This will hold the Flora in place.
Finger Stitching NEOPIXEL
Wrap the NeoPixel wiring around your index finger. End with the Neopixel on the TOP of your fingernail. Secure the wires in place with a running (whip) stitch. Thread wires to the neopixel ensuring a good connection. Once secure stitch neopixel to the glove.
Finger Stitching Color sensor
Similar to the neopixel stitching arp the are of the colour sensor around the same finger until the sensor is touching the base of the index finger (where your fingerprint is located). Remember not to pull the wire too tight as this may damage pr break the connections. Stitch the wire into place and then the sensor. Check for correct fit.
Stitching Codec proto board
Keep the glove on place the Codec Board above the wrist joint. This will allow you to bend you wrist so that your hand can move freely and comfortably. Depending of the length of the glove you will be stitching the board about half way along its length. The Perma-Proto board from Adafruit is designed to mirror the connections of a half sized breadboard.
Connecting the battery
Make sure that the Flora power switch is off. Connect the battery to the Flora’s JST connector. This is the white plastic cube opposite the usb connection. The battery can be secure between the Flora and the Glove. The wire loop can be left. Be careful to connect and disconnect the battery without pulling by the power and ground wires themselves. For a more permanent attachment the wire can be stitched to the glove.